Thursday, January 8, 2015

Lichtenstein Lesson


ROY LICHTENSTEIN INSPIRED LESSON WITH ADAPTIONS

Roy Lichtenstein and his colorful "Pop" artworks makes for an engaging lesson. Adding a language arts component with a lesson on onamonapias creates a great cross curricular connection. Adapting this lesson for students with cognitive and fine motor deficits was relatively easy.


As I gathered students around to discuss the artist after viewing an ABC good Morning clip, the excitement over Lichtenstein's art was evident.  I had the students go around in a circle and name an onamonapia after we discussed what they were. I purposely had my students with learning disabilities go towards the end so they would learn by example. It worked they picked up on those words that sound like they are written.
The objectives of the lesson were to use an onamonapia, use at least 2 illustration techniques that Lichtenstein used, such as ben-day dots, a black outline, primary colors and multiple hatching lines.

 Adapting The Lesson
The lesson was adapted by having students with disabilities use pre-printed or cut stencils for the words, Giving students a choice is very important, you should never just hand them a word you chose.   The lesson's objectives were reduced to only needing one illustration technique to meet the students at their level of readiness.


Offer a choice of spelling the word with pre-cut letters or printed text.


Outlining the newspaper cutout can be done hand-over-hand, independently with verbal guidance or by a paraprofessional as a way to define the area to be painted. Your choice depends on the individual skill level of the student.
Adapted Student Artwork
Student Artwork by able-bodied peer.


Student Artwork created by able-bodied peer.


Tuesday, December 2, 2014

Adaptive Day of the Dead Lesson for Cognitive Deficits


Kids love making skeleton "Day of the Dead" or  Día de Muertos artworks. First grade students drew skeleton portraits with chalk  on black paper, then filled in with white tempera paint. To celebrate the holiday Día de Muertos, we decorated the pictures with flowers painted with paintbrush dipped in pastel colors.
Able-Bodied Peers Art


I adapted the lesson for my special needs students by creating tracers which reflected the negative skeleton image. Students then used a shaving cream brush to paint with adapting for their doorknob grasp. They are much easier for self-expression. 


The skeletons teeth were created by cutting sponges into small pieces and pinching with a clothespin. Sponges on clothespins are great for fine motor development.


Flowers were created by dipping fingers in pastel paint and placing one color in the center and using fingerprints of a contrasting color for the petals. Using body parts to create art allows for a sensory and kinesthetic experience, while creating an awareness of self.


Remember you can engage all learners in creative self-expression.

Gross Motor/Fine Motor Development Lesson inspired by Hans Hoffman


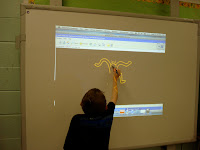
Gross motor adaptations encourage the development of the larger muscles which support and affects the development of fine motor skills. I began this lesson using my interactive whiteboard with a great website by PBS.  http://www.pbs.org/hanshofmann/index.html
This website allowed me to introduce the students to his work with color theory, while allowing my students to be engaged in an interactive activity which illustrates Hans Hoffman's "Push and Pull" theory regarding color. Working on a vertical surface increases trunk stability. Using the interactive pen encourages students to cross their midline which also increases gross motor development.


Having students paint squares was not an option for my students with gross and fine motor disabilities. I adapted this lesson by having pre-cut squares in a variety of warm and cool colors and warm and cool backgrounds. Prior to having the students glue the squares on we looked at three piles of different size squares and rectangles and the students reviewed small, medium and large sizes. The students then glued the large squares first, followed by medium and small. We discussed how cool colors receded and warm came forward.
Show rather than say how to glue.


Part two of this lesson was a print making lesson where students used fine motor skills to select and place cardboard rectangles on cardboard sheets to create print plates. Once dry the students applied ink with a brayer, great for gross motor strength building and then printed warm colors on cool paper. A barren was used independently or for several of my students with limited strength a "hand-overhand" technique was used. Another option would be a weighted sleeve, available from  your schools physical therapist.


Adapting the lesson in this manner allowed students to work independently as they were engaged in the creative process of art making. The result a finished product which illustrated the concept and was aesthetically pleasing allowing for the students self-esteem to blossom as they successfully created their art.
Hand-over-hand if needed


Adaptive Art Ideas,Low Muscle Tone, Fine Motor,Visual Perception,


Quote of the Day "Art is not what you see, but what you make others see." Edgar Degas


Students creating Helen Frankenthaler inspired artworks by pouring paint onto canvas. Check out Frankenthaler's story and art at http://www.theartstory.org/artist-frankenthaler-helen.htm

I'm back with more ideas to allow for greater creativity and success for all learners. For students with disabilities art can be their main form of communication, so remove as many barriers as you can to allow for greater self-expression and communication. This blog is a resource for all of those who believe in the power of learning and art. Feel free to share ideas and ask questions or for advice on how to adapt your lessons, mediums, tools and ideas. I have witnessed in my own teaching that working through a students ability enables the learner to engage in meaningful, creative art making.

Use Soft Plastic Squeeze Bottles
Ideal for glue, paint, or drawing with paint or other mediums.


Small Containers  and Small Pieces
Having students pinch pieces out of small containers increases fine motor pinching grasp.


Tracers  Aide with Visual Perception
Use tracers to block out areas not to be painted and to contain areas being worked on. Use Bluetack or tape rolls to secure tracers.


Consider Weight  Options with Grip Strength
Use Light objects for pressing for those with a heavy press grip and weight metal objects for those with a featherweight grasp.


Keep it Simple for You and Easy for Them
Use cans, cookie cutters, lids, and containers for premade shapes.


Adapt for Each Students Needs

Pre-spread glue and press shapes onto surface.

Adapting Art Lessons


When your philosophy is to work through your students ability, you adapt your lessons by teaching to your students strengths and what skills they possess. Look at the objectives of your lesson and decide which objectives can be reached by your students with disabilities. The objectives for the the lesson below were to create a closeup composition of a musical instrument, create a background using a collage technique, and to add details using an embellishment.

On the left side is the lesson/artworks created by an able-bodied peer, meeting the lessons objectives while encouraging individual creativity.

On the right side is the adapted lesson/artworks where the student was given a choice of several guitar tracers to select from, an outline of the guitars shape was hand-over-hand drawn so the students with low-vision could easily see where to paint. The guitar was successfully painted independently by the students. Re-directing was used with the students to encourage them to fill the entire background with tissue collage. All students with disabilities demonstrated the original lessons objectives while exhibiting choice of color, shape, collage and embellishment decisions allowing individual creativity.
Adaptive Art Tracers

Guitar
Adaptive Guitar
Cello
Adaptive Guitar

Adapting Mediums


In addition to tool modifications you may want to consider adapting the medium you choose. If your student can color but exhibit difficulty grasping a crayon, adapt by thinking, would they be more successful if they used a larger or smaller crayon.  Fine motor skills can be enhanced by using smaller mini crayons or breaking regular crayons in 1/2. If grasping small objects is a challenge, try using larger crayons or specially designed crayons as shown. This is the type of thinking you must use when you consider adapting media. If painting with cotton balls or a sponge held by a clothespin results in greater creativity and control than a traditional paintbrush then proceed in that direction.
     
Adaptive Crayons
Student using adaptive crayon

Removing Obstacles


When you are working with your students think of adapting your teaching style by making everyday tasks in the art room more manageable. New tools can lead to new possibilities in the art room. However, just changing the tools may not be enough. New spring loaded scissors will be of great assistance for hands who do not have enough strength, although cutting on a line may still be difficult. Try creating a think line to cut on by using a wide marker so that it may be seen easier for students with low vision.  Allowing students to work on a larger scale also encourages greater success.


Larger grips, pencil grips and a variety of scissors are available. Student using tool adaptation and visual adaptation of large dark cutting line.